If you create your own custom document library based on the document library feature you get the default views but what if you need extra views? You can take a deep dive into the XML and CAML to create your own view but for complex views this is a time consuming job and is it easy to make mistakes.
I found myself a very easy way to add views to a custom document library:
Step 1
Create a default document library
Step 2
If you have your own content types, link them to your document library
Step 3
Create the views you need (with filtering, grouping, sorting, ...)
Step 4
Reverse engineer your document library with the SharePoint solution generator
The SharePoint Solution Generator comes with "Windows SharePoint Services 3.0 Tools: Visual Studio 2005 Extensions", you can download it here
To reverse engineer your document library these are the steps:
- start the SharePoint Solution Generator
- choose for'list definition'
- fill in the url of the site where your document library is located
- select the document libraries you want to reverse engineer
- choose a name for the c# project
- Click 'Finish'
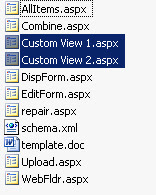
this is the result if you go to the solution folder:

Step 5
Copy the aspx files of the views to your custom document library folder, in this example: "Custom View 1.aspx" and Custom View 2.aspx"
Step 6
Edit the ASPX files of the views and remove the first comment line of the file. This is everything before "<%@Page ..." Otherwise you will get an error if you use your views. (I think this is a bug in the Solution Generator).

Step 7
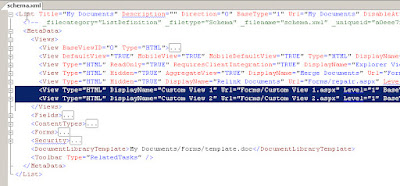
The last step is to modify the schema.xml of your custom document library. You can copy past the lines from the reverse engineered document library schema.xml.
Go to the schema.xml of your reverse engineered document library and collaps the tags like the screenshot below. You now have a good overview of the views in you schema.xml. Do the same with the schema.xml of your custom document library. Now you only need to copy paste the two code blocks selected in the screenshot below to your custom document library.

Step 8
Deploy your solution and test your views!
Maybe a last tip : keep the default document library you created with the views in step 1 for future changes. (you can always try to reverse engineer an instance of your custom document library but for me the SharePoint solution explorer crashed on that ...)
5 comments:
Great tip! I'll give it a try in the future.
I tried this out and it worked great, the new view showed up in my list of views for the doclib, but the view did not look like I wanted it to. It didn't have the right columns selected nor did it have the look I was expecting. I tried editing the view section that I had copied into schema.xml but no luck.
Any suggestions?
Thanks for your advice I made it and it was so helpful to me and each time that my friends ask me how did I do that I just tell them to visit this blog because it is amazing.Generic Viagra Buy Viagra
car insurance missouri Ooohh, I am quite interest inside your domain. If I set up 1 internet site utilizing this domain, I can earn 100-200 USD daily. Your domain is really good. Should you do not need to sell this domain, I can cooperate with you on the condition which you share 50% earnings with me. :D Martin , texas car insurance
I absolutely love your blog and find almost all of your post's to be precisely what I'm looking for.
can you offer guest writers to write content to suit your needs?
I wouldn't mind composing a post or elaborating on many of the subjects you write about here. Again, awesome weblog!
Have a look at my weblog ... Dental Implant Costs
Post a Comment